One of the most wonderful things about Instagram for me is that it allowed me to meet a lot of amazing people. One of them is Helen, @helenalicesews, who is an amazing seamstress, couture student and friend. I ended up attending Tandy Leather’s cosplay workshop day up in Manchester, and she had a panel about corsetry, which included her pattern for her red corset, which she also used as a base for other projects (#versatile).
When she offered for me to try it on, I was adamant it would not fit. She said it was made for a 25” waist. Mine is nowhere near that. Usually measures around 30.5” on a good day. But for whatever magic reason, it fit! And it gave me that dramatic Disney shape that I loved.


It was a beautiful corset so as soon as I got home, I immediately got to working on it. I transferred the pattern onto paper and made a mock-up out of some leftover black twill I had lying around. I also boned (most) of the boning channels.

I bought coutil for the first time for this project. I got it for £10.5 p/m at my local fabric shop and I bought one meter. The fashion/outer fabric was this scrap of ivory satin I had kicking around… from something. I keep finding random bits of fabric that I don’t remember how I acquired them.

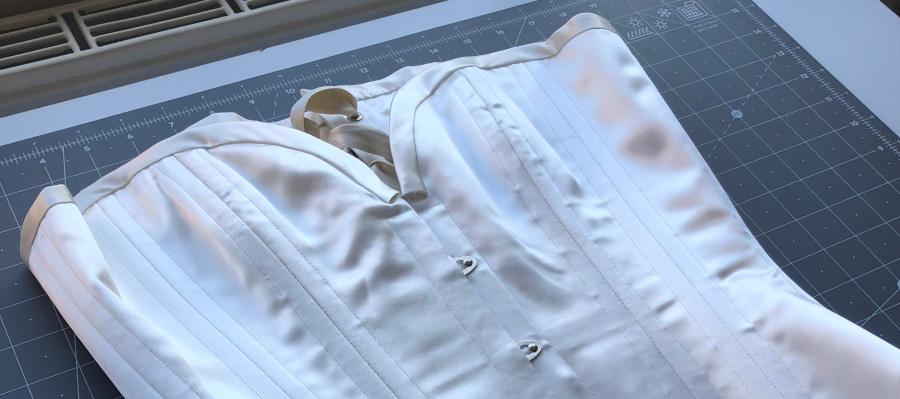
The corset had five pieces that needed to be cut twice (so ten in total), and they were cut out of the satin and the coutil.

I also cut it out of this leftover scrap of cream cotton fabric for the lining.

The next step was to interline the satin with the coutil. This meant basting each section together, wrong sides of each fabric facing each other. I have done this on the machine a few times, as I use interlining for most bodices I make. However, with slippery fabric, it seems that the fabric always shifts and bubbles up. So I decided to hand baste the pieces together (I was really invested in trying to make this corset a great example of my sewing. It didn’t work out as hoped for.) It was a little more time consuming but a much better result.

Then it was time to insert the busk! I bought one online from Sew Curvy and I also used her tutorial for this. I’ve only actually inserted a busk once or twice, but it’s quite a straightforwards process, just involves some careful stitching.


I slid the busk with he loops into place and top stitched around it. This is easier to do with a zipper foot on. That was finished! The other side is a similar process, but you mark the studs instead. Then used an awl to make perforations and used fray check on them. I slid the stud side of the busk into place and top stitched around as well. I didn’t take many photos of the process as the existing tutorial already explains it very well!
Then I went ahead and started on the seams. First, I had to prep the back lacing panel. I ironed them in half and stitched along the edges to form boning channels, with a larger channel in between them for the eyelets.

Side seams proceeded as normal, clipping the seams and ironing them as I went.

Every seam that I did, I also immediately topstitched the seam allowances down, forming boning channels.


I also added a makeshift waist tape. I thought, better to have a crappy one that none at all. I used heat and bond to secure it at every intersection with the seams, keeping it at the waistline and taught.

I assembled the rest of the lining and then seamed it to the front panel’s lining that was already in place.
To bone it, I used flat steel boning at the centre back and spiral steel boning for ever other channel.


Then I basted the top and bottom edge of the lining in place.

I finished off the lining by hand, by matching up the seams and pinning them. Then I turned the raw edge under and whip stitched the edge down.

I put in some metal eyelets in the back.

I also made my own bias tape from the ivory satin to bind the top and bottom edges.

I pinned the bias tape with right side to right of fabric, and sewed it down with a half an inch seam allowance. Then I pressed it up, and over to the wrong side. I pinned the raw edge under and finished it off by hand.


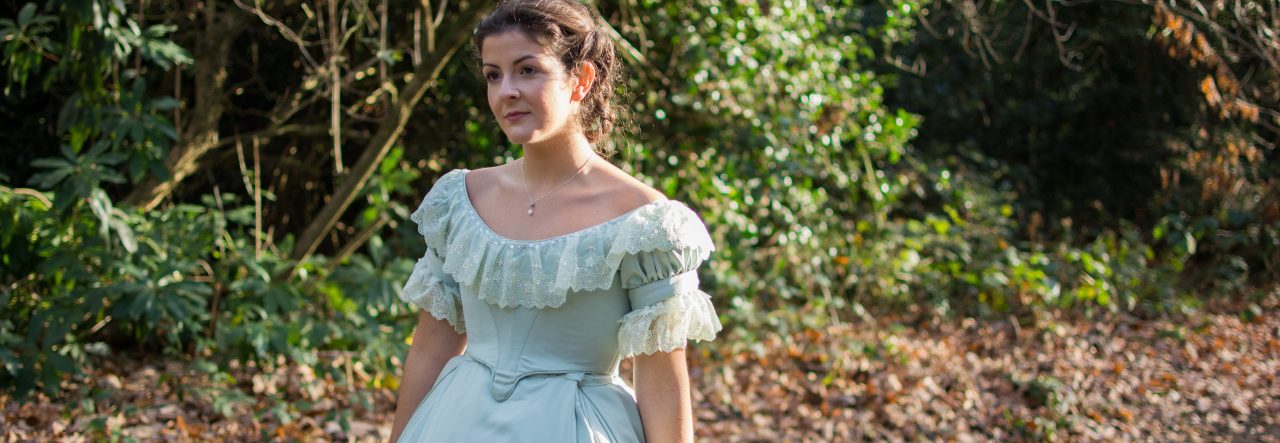
I really like this corset, but I forgot to add a little flap at the front behind the busk (which Helen did warn me about and I still forgot to!) But I think I’ll quick fix it by adding some ribbon. I really like the way this corset turned out! The shape is wonderful. I’m not very happy about how the bias binding looks at the centre front, so I may add some sequins or embellishments to spruce it up a bit. But otherwise, a lovely addition to my growing collection of undergarments!


